Object detection with OpenCV
An interesting usage of the classification algorithms is object detection in live images. In this tutorial we will demonstrate how to detect a simple object using the open source library OpenCV. After a short description of OpenCV, we will see the steps needed to produce a model file using the OpenCV Cascade Classifier. This step is also called training the model. The model file will be then used to detect an object in the live images taken from a USB web camera. The model creation and the object detection code were tested on a laptop running Ubuntu 14.04 LTS. Basic C/C++ programming knowledge is required for this tutorial. A USB web camera is also needed.
OpenCV Library
OpenCV (Open Source Computer Vision) is a open source library which contains function for real-time image processing. The library is written in C++ and distributed under BSD License. It can be run under Linux, Windows, OS X, iOS, Android and has wrappers for Python, Java, C# and Ruby. It can be used for: object detection, motion detection, augmented reality, facial recognition or gesture recognition.
For this tutorial you will need to install OpenCV onUbuntu: OpenCV install on Ubuntu.
Trainig the model
In this section we will create a XML model file, which will be later used to detect the objects. For no special reason I choose a brezel (engl. prezel) as detection subject. The model creation process involves gathering a large amount of images containing the subject – we will call these positive images. We will also need a large a large amount of images not containing at all the searched object- negative images. Using the two folders and some description files we will run the OpenCV Cascade Classifier algorithm in order to produce the model file.
These are actual steps:
Step 1: I started by taking 201 JPG images of the brezel using a mobile phone.
Step 2: I installed GIMP for Ubuntu then I added David’s Batch Processor to the installation using the command:
sudo apt-get install gimp-plugin-registry
Step 3: I created a batch process to convert the original images to grayscale and to resize them to 60 x 80 pixels. These 201 images will be used in the next steps to produce additional training images
Step 4: I took the grayscale images and applied the following transformations:upside-down (+201 images), blur 3.0 (+201 images), brightness +0.5 (+201 images), brightness -0.5 (+201 images), contrast +0.5 (+201 images), contrast -0.5 (+201 images). I ended having 1407 positive images.
Step 5: Created a folder named positives and moved all the images to this folder.
Step 6: Created the positives.txt file. This is a descriptor file for the positives folder. Each line in this file contains the path to a positive image, the number of objects (brezels) in this image, the coordinates of the bounding rectangle containing the object.
find ./positives -iname "*.jpg" > positives.txt
sed -i 's/.jpg/.jpg 1 0 0 60 80/' positives.txt
Step 7: Downloaded the negative image files from this tutorial. Moved all negative images in a folder called negatives.
Step 8: Created the negatives.txt file. This is a descriptor file for the negatives folder.
find ./negatives -iname "*.jpg" > negatives.txt
Step 9: Prepare a training dataset from 1200 positive images, using the following command:
opencv_createsamples -info positives.txt -num 1200 -w 60 -h 80 -vec training.vec
Step 10: Train the model using this commands
mkdir data
opencv_traincascade -data data -vec training.vec -bg negatives.txt -numPos 1000 -numNeg 1000 -numStages 10 -nsplits 2 -w 60 -h 80 -featureType LBP -minhitrate 0.999 -maxfalsealarm 0.5
Depending on the hardware the training can last a few hours. On my computer I got the model after 3:41 hours:
Training until now has taken 0 days 3 hours 41 minutes 55 seconds.
The resulting model file can be found found in the data folder and is named cascade.xml. I took this file and renamed it to brezel.xml. As a reference you can have a look at my trained model available in this archive brezel.zip.
More on training the model can be found here: http://docs.opencv.org/doc/user_guide/ug_traincascade.html
Using the trained model to detect objects
In this section we will see how to create a simple C++ Project, add the needed libraries to the project, add the model and do the actual object detection. As development tool I used Eclipse Luna (4.4.0) with CDT (C/C++ Development Tools).
Following, are the steps needed to setup and run the project:
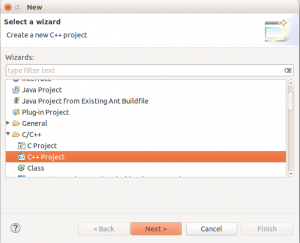
Step1: Start Eclipse and create a new project: File > New > Other > C++ Project.
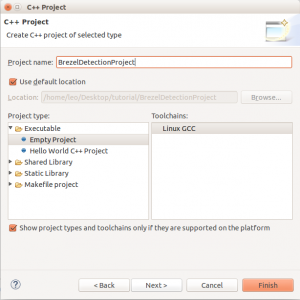
Step2: Name the project BrezelDetectionProject, the press Finish.
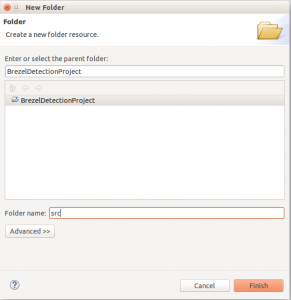
Step3: Right click on the project and choose to create a new folder named src.
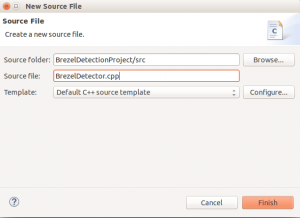
Step 4: Right click the src folder and create a new .cpp file, BrezelDetector.cpp.
Step 5: Add the following code to the .cpp file.
#include <highgui.h>
#include <iostream>
#include <stdio.h>
#include <cv.h>

using namespace std;
using namespace cv;
using namespace std;

int main() {

	cvNamedWindow("Brezel detecting camera", 1);
	// Capture images from any camera connected to the system
	CvCapture* capture = cvCaptureFromCAM(CV_CAP_ANY);

	// Load the trained model
	CascadeClassifier brezelDetector;
	brezelDetector.load("src/brezel.xml");

	if (brezelDetector.empty()) {
		printf("Empty model.");
		return 0;
	}

	char key;
	while (true) {

		// Get a frame from the camera
		Mat frame = cvQueryFrame(capture);

		std::vector<Rect> brezels;

		// Detect brezels
		brezelDetector.detectMultiScale(frame, brezels, 1.1, 30,
				0 | CV_HAAR_SCALE_IMAGE, Size(200, 320));

		for (int i = 0; i < (int) brezels.size(); i++) {
			Point pt1(brezels[i].x, brezels[i].y);
			Point pt2(brezels[i].x + brezels[i].width,
					brezels[i].y + brezels[i].width);

			// Draw a rectangle around the detected brezel
			rectangle(frame, pt1, pt2, Scalar(0, 0, 255), 2);
			putText(frame, "Brezel", pt1, FONT_HERSHEY_PLAIN, 1.0,
					Scalar(255, 0, 0), 2.0);

		}

		// Show the transformed frame
		imshow("Brezel detecting camera", frame);

		// Read keystrokes, exit after ESC pressed
		key = cvWaitKey(10);
		if (char(key) == 27) {
			break;
		}
	}

	return 0;
}
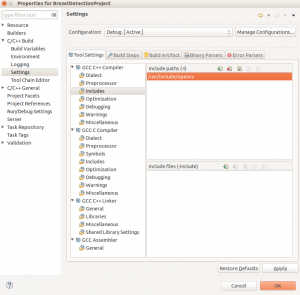
Step 6: The project does not know where to find the OpenCV libraries. To fix that go to Project > Properties. In the C/C++ Build section, go to Settings, in the right pane select Tool Settings. In the GCC C++ Compiler section go to Includes and add to Include paths (-l) the folder where OpenCV is installed. For me the the path is /usr/include/opencv.
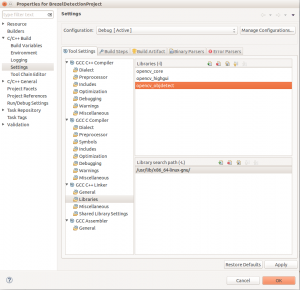
Step 7: Go to GCC C++ Linker section, Library search path (-L) and add here the path to the OpenCV libaries. For me the path is /usr/lib/x86_64-linux-gnu/.
Under in Libraries(-l) add the following libraries one by one: opencv_core, opencv_objdetect, opencv_highgui.
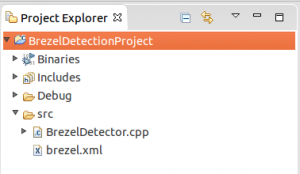
Step 8: Add your xml model file to the src folder. The final project structure should look like this:
Step 9: Attach an USB web camera and run the program. The program can be stopped using the ESC key.
You can see results in the following short video:
Conclusion
We saw how we can use OpenCV to train a model for object detection and how to use this model to detect objects in live images. This is just a small use case of this computer vision library. Generally speaking, the computer vision has a wide application field and can handle areas like
- Controlling processes – industrial robots;
- Navigation – autonomous vehicle or mobile robots;
- Detecting events – for visual surveillance or people counting;
- Organizing information – indexing databases of images and image sequences;
- Modelling objects or environments – medical image analysis or topographical modelling;
- Interaction – input to a device for computer-human interaction
- Automatic inspection – in manufacturing applications.
Interested to find out the latest in the computer vision field? You may be interested also in the following article: https://technobium.com/computer-vision-next-generation/
References
http://docs.opencv.org/modules/objdetect/doc/cascade_classification.html
http://docs.opencv.org/doc/user_guide/ug_traincascade.html
http://docs.opencv.org/doc/tutorials/introduction/linux_eclipse/linux_eclipse.html
http://note.sonots.com/SciSoftware/haartraining.html



Hello!
Hi,
Quick question:
Did you crop your images in the positive folder ?
Would it be possible for you to share the negative and positive folder as a zip just to see how these data supposed to look like ?
Thanks
I’ve Segmentation fault: 11 when i try to train classifier at step 10. Can you help me?
Thanks!
Hi Carlo,
Unfortunately I haven’t experienced this error during the training. It looks like your OpenCV installation is faulty. Maybe reinstalling OpenCV would help.
Regards,
Leo
Please, when I take the pictures, is it necessary the object in white background?
Hi Guilherme,
No, it is not necessary to have a white background in the image containing the object. I took the pictures with different background colors in order to obtain a better model. The more diverse the background, the better.
Regards,
Leo
Can you please share the XML file, if not then at least mention what should be the content of that XML file.
Hi Rohit,
Sure, no problem. I created an archive with my model brezel.zip. You can use it as reference.
Regards,
Leo
Hello~ I’m a korean university student.
My major is software programming.,
When I did TRAINING THE MODEL-step10
I got this error message…
root@ubuntu:~# opencv_traincascade -data data -vec training.vec -bg negatives.txt -numPos 10 -numNeg 10 -numStages 10 -nsplits 2 -w 540 -h 960 -featureType LBP -minhitrate 0.999 -maxfalsealarm 0.5
terminate called after throwing an instance of ‘std::bad_alloc’
what(): std::bad_alloc
Aborted (core dumped)
what can I do…
Hi Bell,
It seems that you are trying to allocate too much memory. The width and height for the images are too large (540 x 960). As you can see, I used 60 x 80 images.
Also the number of positive and negative images is too low for the training to produce meaningful results.
Please try decreasing the image size and increasing the number of samples – positives and negatives.
Best regards,
Leo
can u find 2 or 3 thing this method?
Hello Nithy,
Yes, if you have 2 or 3 models, you can create a CascadeClassifier for each of them. Inside the loop you will detect the objects one after the other.
Best regards,
Leo
thanks . i want to detect 2 thing from photo or video. please can you help me.
Hi Nithy,
Sure. Which step is creating problems?
Best regards,
Leo
i want to identify one animal from a photo. what kind of feature identify tht animal to processing?
Hi Nithy,
In order to identify any kind of object (the animal for example) in an image, you have to train the model using many positive images. Positive images are the images that contain the targeted object. The more images and diverse positions of the object in the images, the better. With the trained model you can then identify the object. So, the first step would be to gather images with the animal you want to identify.
Regards,
Leo
Hi, First of all great tutorial thanks !
I was wondering why do you need 60×80 size images ? why does that size seems optimal to you ?
Best wishes
M-S
Hi Minh-Son,
Thank you!
I experimented with several image sizes and this was optimal in my case. If you choose a bigger size you will have a good model, but the learning will take longer. This size was sufficient to obtain a good model, yet not to spend too much time with the learning process. Finding the right image size was a trial and error process.
Best regards,
Leo
Does your Brezel Detector works for this particular Brezel(you used in your training). I mean, have you been using the same brezel object for training as well as detecting? Or your code works for the class ‘Brezel’
Hi Manish,
I used the same brezel for training and detecting, the model is not suited for all types of brezels. The quality of the model depends on the quality and quantity of the training images. For a more precise model I should have used images with different types of brezels in various positions and angles. For the purpose of my demo though, the current model was good enough.
Best regards,
Leo
It would be great if I could see the source code.. Is this open demo open source? Can I find it hosted on github?
And one more thing can this method detect the brezel in any angle and not just the top view?
Thanks
Hi,
The code in the .cpp file is all the code you will need to run the current demo. It is free for use. The most important part though, is the model file (brezel.xml) which is not shared yet. For your specific problem you should train a new model according to the steps I described in the tutorial.
For your last question: it depends on the training images. As I trained my model with images taken from the top, it would detect the brezel only from the top. Had I used training images with brezels taken at different angles, the application would most probably have detected the brezel in different angles.
Kind regards,
Leo